Two of us, Marie Naka and Jessica Cruz, worked together to design and teach a hands-on inquiry-based basic science lesson about sound vibrations because we believed it would address multiple needs and grade levels of this mixed-age after school program.
Classroom Context
This lesson was taught at Trinity College Boys & Girls Club to a group of about 15 elementary and middle schoolers from various schools in Hartford. The students are all learning different things in school, but a common interest among many of them is music.
Student Learning Objectives
- Students will compare the ways sounds are made and the differences in sound those methods produce.
- Students will relate vibrations to the generation of sound and music.
- Students will create their own guitar with strings of different pitch to form a song.
Guiding Question
How can you make different sound pitches with everyday objects?
Learning Activities
Launch
To introduce the Guiding Question, we launched the lesson by showing the students ordinary objects, a cup and rubber bands, put together to make a DIY Guitar (can be seen in the foreground of Figure 6). We then asked students to listen to the tune that Marie will play and guess the song. After the students guessed the song correctly, we stated that in today’s lesson we will find out “How can you make different sound pitches with everyday objects?” Additionally, to prepare for the rest of the lesson, we shared that they will make their own instrument but before we can do that, we have to understand how the sounds are actually made – which leads us to our next activity.
Vocab/Concept establishment activities
The following activities are done with the goal to identify and define relevant words to prepare students in creating their DIY Guitar and to answer the guiding question. Throughout these activities we will need a poster and pen to collaboratively establish the vocab with the whole class.
*To note, the two key words necessary and (the ones we ended up defining) are “pitch” and “vibration” but we highlighted other possible words below. Furthermore, the key concept we established was the differences between higher and lower pitches in terms of different vibrations.
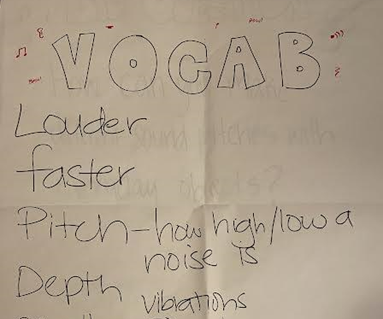
Vocab Activity 1 (focus on “pitch”): Students were instructed to make sounds with different objects around them for around 10 seconds. With a follow-up discussion and poster, we asked a few questions and wrote down words that students used in their responses. The questions that we asked went as follows:
- What are the differences between the sounds made?
- What are some words we could use to describe the differences? (ex.: pitch, tone, length)
- We will define these vocabulary terms together on poster paper for reference during the lesson. (Pitch: the height of the sound; Tone: type of the sound; Length: how long the sound lasts; etc.)
Then, assuming that students brought up pitch, (if not, if students bring up different sounds in general, the instructor can connect that to the word ‘pitch’), we work together to create the definition for pitch.
- What are the differences in how you are making the sounds? Force of a hit? Material of object? Points of contact/muffling on the object?
To answer this, we used the following activity.
Vocab Activity 2 (focus on “vibration”): In this second vocab activity, we look closer at how sounds are made. We twanged a ruler against the edge of a surface and asked students to give us ideas for how to make different sounds by adjusting our actions.
With the ideas given to make different sounds with the ruler we established the term “vibration” and worked as a class to form a definition for it.
To define vibration we asked students to think about:
What is the ruler doing? How does it change? How do different vibrations make different sounds?
Vocab Activity 3 (focus on key concept): Lastly, we show the students the connection between vibration and pitch with rubber bands. Also, we add this to the vocab poster.
(Originally, we were going to show this example with just the teachers doing it.)
To do this, three students got a rubber band and with a partner next to them, each pair would pluck the rubber at different times with the goal to make different pitches knowing now that vibrations affect the production of sound from the ruler.
With that, we will establish that stretching the rubber bands differently, it changes how much the band can vibrate and how high/low the pitch is.
- Use one rubber band and stretch differently.
- Tightened rubber band→higher pitch
- Loosened rubber band→lower pitch
DIY Guitar Prep & Assembly
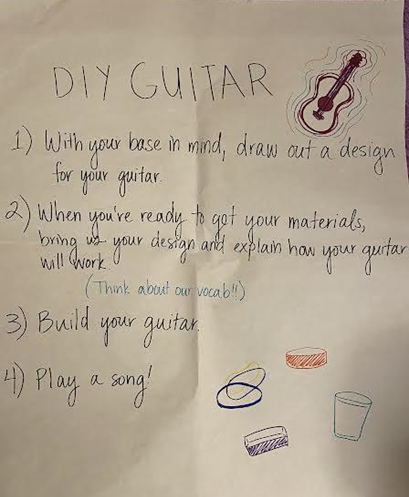
Then, students are instructed to get into groups of 2-3 students and one student from each group can pick a base for their DIY guitar (options included plastic cups, pieces of an oats container, a pitcher, and a variety of metal and plastic containers), a piece of paper, and a colored pencil. Additionally, we also make it known that they will get rubber bands after their design is made.
Then, students are instructed to make a diagram of their plan for the construction of their guitar to, in the end, play a song. We then walk around and ask students to explain their diagram to us (using vocabulary from steps 2-3) in order to get the rest of their materials.
Also, students explain the assembly of their guitars to the camera if comfortable, sharing how they worked and why.
After students have told us their plans and we have given them a handful of rubber bands, they are given 10 minutes to assemble their DIY Guitar.
Closing
Finally, we had students play “Name That Tune” or play their own original song. After the first student played a song, we asked students to answer the big question regarding their own guitars. Then we opened up the conversation to the whole class.
Challenging Inequity
Our lesson was taught to a mix of students across grade levels, ages, and schools. It attempted to engage multiple levels of learners to account for these differences, which is why we centered the lesson around a broader project as opposed to a single piece of subject material that might be covered in a class. The accessibility of the lesson to different groups of students falls into the principles of Universal Design for Learning.
Assessment
Before Teaching
Prior to teaching, our plans for measuring learning were to use the collaborative vocabulary poster, as well as the DIY guitar plans and the students’ explanations of them. We planned to ask students to share their final DIY guitars with the camera, and to explain their guitar using the vocabulary we explored together during the lesson.
After Teaching
We carried out our assessments as planned, though not all of it showed learning as clearly as we’d hoped.
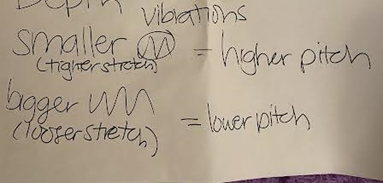
We worked as a whole class to come up with vocabulary and definitions (Figures 1 & 4), but our questions did not so much guide the students to the answers as spell them out directly. We were looking for too specific answers, and the students weren’t getting to them from the activities we had shared with them. We were able to get to the answers eventually, and there was a great deal of teamwork involved getting there, but we had to do lots of prodding that undermined the learning we had expected to take place.
We collected students’ plans for their guitars in another hope of seeing the learning that had taken place, but we ran into trouble when it came to student engagement. Our lesson, having to accommodate for many different ages of students, was not as all-engaging as we’d thought it would be, and many students seemed uncommitted to giving the activity their all. Still, there were some students who created telling diagrams for their DIY guitars.
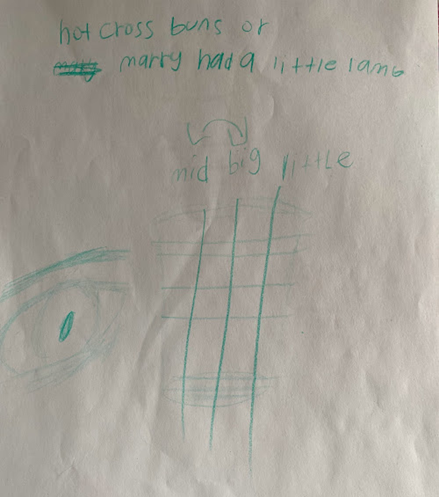
The above diagram, doodling aside, showcases a group of students who were considering their end goal of playing a song (“Hot Cross Buns,” or “Mary Had A Little Lamb”), and who thought about how to make their rubber bands produce different sounds. When asked about their diagram, they explained that the rubber bands would need to have big, medium, and little vibrations, respectively, in order to achieve the right notes. Though the specific vocabulary was not used, these students conveyed an emerging understanding of the concepts we had discussed.
The most effective forms of assessment were talking to our students and having them explain their final products. As students planned and made their guitars, we walked around the room and asked students about what they were doing. Again, there was a lack of use when it came to the vocabulary from earlier in the lesson, but if we asked about it, the student knew what we meant and how it related to their work. In Figure 3, we can see such a progression; the students explain their guitar in a more personalized fashion, and then to clarify, we asked a follow-up question about how to “tune” their instrument, which would require applying the concept we had looked at in the lesson. After a short moment of thinking, the students were correctly able to identify how they would make a rubber band a different pitch by adjusting the length of the vibrations.
Reflection
In conducting our first lesson, improvisation and lesson adaption went well. We were able to recognize when our tasks or activities were not sustaining engagement or needed more support with examples through students’ focus, noise level, etc. By recognizing and now being familiar with signs of disengagement, as we have individually taught 3 lessons prior, we were able to make quick changes to our original plan. For example, the goal for the vocabulary-establishment activities (using noise making, ruler, and rubber band) was to evoke excitement and make connections with the different objects and their sounds. However, there were not as many signs of engagement (side conversations, one side of the room not responding as much) especially with the ruler activity because only the teachers were using the ruler and it was done in a limited spot in the room causing a lack of interaction (shown in Figure 6). Thus, the ruler activity didn’t help us with connecting concepts (shown in Figure 7 below) of vibration which could be due to the level of interaction. With this, we knew that we needed to change what we were doing, as we’ve learned that higher engagement will allow for more active participation and motivation to think about the concepts presented. So, successfully, for the following rubber band activity, instead of only the teachers showing students vibration with a rubber band, we gave three random students around the room a rubber band to pluck and make different sounds to establish pitch for our vocab. With this, students were able to make connections and students were able to answer more questions showing higher engagement and thinking.
Figure 6. Lack of interaction with the whole class during Ruler (vocab-establishment) activity
Moreover, the timing of our lesson and factors that went into that including age range and needs for an after-school activity was unexpected. Specifically, our lesson was 45 minutes, however we planned for an hour and we thought there were going to be mostly middle schoolers. This could be due to the lack of interest and rigor for student’s after-school needs (non-standard classroom structure) and for the wide range of students, which to our surprise consisted of half middle schoolers and half elementary students. Due to the lack of interest from many students, we moved a little faster to try other activities and ways of going about the lesson. As mentioned before, the vocab-establishing (Figure 6) activities were a little less interactive than expected which can signal to us that although the activity had interactive components like students plucking rubber bands for the discussion and making noises, it was not at the level of interaction or rigor needed to entertain and get the middle schoolers interested and thinking. Another unexpected aspect of the lesson was the rubber bands we used were much quieter than expected and there was some technique involved (Figure 7) to make sure noise would come from the rubber bands (and possibly even the ruler). This caused some limitations on how we could demonstrate the different pitches and sounds of the rubber bands and the show & tell at the end. Luckily, we also had our ukulele to help support this part of the lesson which solved some of the volume issues that caused some students to not hear the pitches and different sounds which didn’t allow them to make connections (Figure 8).
Figure 7. Difficulties with making sounds with the rubber band and students finding different ways to make noise.
Figure 8. Teachers using the ukulele to help with limitations in sounds with ruler and rubber bands to guide student thinking.
Although the unexpected occurrences aforementioned may have made limitations on our examples for exploring pitch, students learned how to change pitches even if they didn’t use the word “pitch” to describe what they were doing. In this way, they were able to thoroughly meet the first and third objective. We know this because they were able to connect what they discovered in our vocab establishing activities to how they will make different pitches for their DIY guitar through their preliminary designs and actually making it. For example, when being asked about their designs and how they will make different pitches, a student with the pitcher as their base said “I’m going to put the rubber bands at the top to be more stretched (where the handle was) and other at the bottom so it’s less stretched.” Additionally, when playing the guitar, the students from Figure 5 exemplified their understanding of different sounds and the way they’re produced and creations of different pitches to form a song (objectives 1 and 2), as seen in this reconstructed discussion below:
2 students discussing playing “Mary Had A Little Lamb” on their DIY guitar
Teacher: Do you want a fourth rubber band so that you can play the song?
Student A: No thanks.
Teacher: But how will you play the song with three rubber bands? The song has four notes.
Student B: No, I can play it. *plucks out the tune, placing his finger against one string to make the fourth note*
Teacher: Oh! You’re changing the pitch of the string by stretching it with your finger in the middle of the song?
Student B: Yeah.
They met the second objective, but not thoroughly, because when going back to the big question (Figure 9), students did not bring it back to that aspect of vibration. Moreover, when discussing during the vocab establishment activity, it took some probing and reconnection for them to think about vibration.
As far as our teaching goes, we definitely need to rethink our target skill level of the lessons. We’ve both written lessons for elementary schoolers in the past, and while it’s tricky to create a lesson that will be interesting and accessible to multiple age groups, we undershot on the difficulty for this lesson. It seemed easy for all students, and many of the students lost interest or didn’t take the activities seriously.
Additionally, we’d forgotten how chaotic the classroom space can be. For our future lessons, we need to be more cognizant of how to effectively communicate with students despite the auditory and visual limitations a busy classroom creates. The activities we’d put together for this lesson worked well in a small space with a small number of people, but, as evidenced by the issues with the volume of the rubber bands and the ruler, the activities didn’t necessarily translate nicely to a larger scale.
It didn’t help that we started rushing through questions when we noticed disengagement. Though our questions were easy and uninteresting to some students, speeding through them only confused the students and ourselves, which made it a struggle to stay in line with the progression of our lesson that could’ve changed the way students processed the concepts we were trying to go through with them. Since we were unclear in the beginning of our lesson with the vocabulary activities, students weren’t referring back to those definitions as naturally as we’d expected them to. They did grasp the vocabulary, and if we asked them to relate back to it they did, but it might not have been in their minds when designing or creating their guitars.
While we hadn’t quite remembered the challenges we would run into in the classroom, we weren’t entirely surprised by them, and we knew better how to adjust our lesson in response to them. We recognized when students were losing interest, and we improvised to try and get them engaged again. During our first lesson last year (see Teaching and Learning), we were shocked by deviation from our lesson plans and weren’t sure where to go after they were inevitably disrupted. This time, we more reasonably assessed the situation and figured out a new path to completing our objectives as best we could with whatever happened.